British Operations In darfur 1916
A wargamer's Guide
Having built fairly massive forces for the
British Operations against The Mad
Mullah as my main project in 2010 using plastic figures from the Sudan Wars
period of the 19th Century and a few others I started playing the
games. After a while I thought
“What else is the Mad Mullah’s army useful for?”
The obvious answer is the Sudan Wars!
But that would be a nineteenth century war and I was looking a bit more
unusual and more modern. So a
little searching through some old books yielded a reference to a short campaign
in Darfur in 1916. Funny how these regions
seem to crop up again and again in military history? A visit to the
National Library in Edinburgh yielded some information and photographs.
The army could be used almost exactly as I had made it!
Not only that my model British forces only needed a plane and few trucks
added to make them into the Darfur Field Force.
Two campaigns for almost the price of one!
So here is an outline of the campaign
and a couple of scenarios.
Operations in Darfur – 1916
Ali Dinar Zakariya Mohammed al-Fadl returned home to Darfur
(Land of the Fur) in some haste from the Sudan after the defeat of the Khalifa
at Omdurman in 1898. Despite having
followed Khalifa he was accepted by the Sudanese authorities as their agent.
Mainly this was because he appeared to be the most powerful tribal leader
in Darfur and most importantly he appeared to be willing to accept the right of
the Sudan Government to control the area.
By 1901 he had become the independent ruler of Darfur and for this
privilege he paid a nominal tribute to the Governor General Baron Sir Rudolph
von Slatin Pasha in Khartoum. He,
therefore, carried on the line of an independent Sultanate that stretched back
to 1650.
The Rizayqat tribe under Musa Madibbu rose against him in
1913. Ali Dinar tried to suppress
the revolt in October and was defeated with the loss of 500 men, 100 horses and
70 rifles. The Rizayqat lost 300
men, mostly spearmen in the action.
A further action was fought on 1 November and Slatin Pasha had to intervene to
bring Musa to heel. Ali Dinar lost
considerable face by having been rescued by Slatin Pasha and this should not be
underestimated in the light of his subsequent actions.
Nor should his devotion to Islam be underestimated.
In spite of or, perhaps, because of this loss of face Ali
Dinar went on to quarrel with a Kordofan tribe, the Kababish and then with most
of his neighbours. When Britain
deposed Khedive Abbas II in Egypt in 1914, he refused to accept this and
established communications with the Sanusi at Kufra Oasis who were in opposition
to the British at the time and were to invade Egypt in 1915-1916.
When the Ottoman Empire entered the Great War on 29 October 1914 he was
the only major Sudanese leader not send any missive declaring his support for
the Sudanese Authorities against the Turks.
Indeed, he probably felt optimistic of receiving support from the Germans
and Turks who were already assisting the Sanusi with arms, munitions, training
and advice. The Grand Sheikh of the
Senusi, Sayyid Ahmed al-Sharif, was successfully driving the Italians back to
the Lybian coast, was supporting forces in Tunis against the French and was
preparing to invade Egypt.
 He
maintained a relatively low profile for a time but he continued to make himself
unpopular with his neighbours, even addressing a letter to “the Sirdar who
presumes that he is King of the Sudan on 22 Aptil 1915.
Then on 13 March 1916 he sent a letter to Enver Pasha, the Ottoman
Minister for War, for support against the “English and French”.
He may have believed the Turco-German propaganda that they intended to
create an Islamic state in northern and central Africa once the British, French
and other Europeans had been expelled.
The Ottoman story was, at least partly, believable in that the Empire was
home to the holy places of Islam.
The mood in the Arabian provinces was changing towards open revolt fuelled by
the execution of Arab Nationalists in Syria.
Given this background it is hardly surprising to find that Ali Dinar was
viewed with some suspicion. Then
the Sultan went too far when he sent raiders into the Sudanese province of
Kordofan and Sir Reginald Wingate, the Governor-General, ordered a punitive
expedition under the command of Col PV Kelly.
He
maintained a relatively low profile for a time but he continued to make himself
unpopular with his neighbours, even addressing a letter to “the Sirdar who
presumes that he is King of the Sudan on 22 Aptil 1915.
Then on 13 March 1916 he sent a letter to Enver Pasha, the Ottoman
Minister for War, for support against the “English and French”.
He may have believed the Turco-German propaganda that they intended to
create an Islamic state in northern and central Africa once the British, French
and other Europeans had been expelled.
The Ottoman story was, at least partly, believable in that the Empire was
home to the holy places of Islam.
The mood in the Arabian provinces was changing towards open revolt fuelled by
the execution of Arab Nationalists in Syria.
Given this background it is hardly surprising to find that Ali Dinar was
viewed with some suspicion. Then
the Sultan went too far when he sent raiders into the Sudanese province of
Kordofan and Sir Reginald Wingate, the Governor-General, ordered a punitive
expedition under the command of Col PV Kelly.
The logistic problems facing this expedition were
considerable with only the first phase of the movement being from Khartoum to El
Obeid. This move of 428 miles was
by rail. The next phase, however,
was to cross a similar distance of desolate and trackless terrain that was
almost empty of human habitation, devoid of food supplies and only a handful of
wells. The climate was so hot that
at one point it was claimed that the water in the metal containers was boiling.
The expedition was entitled the Western Field Force or, colloquially, the
Waterless Fatigue Force.
The British Intelligence Officer responsible for Darfur, Captain H.A. MacMichael,
estimated that the Fur Army could put into the field 800 Regular Cavalry, 3,000
Regular Infantry with rifles “but very badly trained and ill-equipped with
ammunition”, and perhaps up to 2,000 irregular spearmen.
 On
12 May 1916 Lt Bellamy of the RFC carried out an aerial reconnaissance of El
Fasher (al-Fashir) and dropped leaflets promising a return to freedom, security
and justice to the townsfolk. Two
days later the Field Force was at Abiad some 80 miles from El Fasher.
Here Col Kelly faced a dilemma.
The direct route was across waterless terrain while the longer, indirect
route, went by way of Mellit where there was a good water supply.
This diversion added 26 miles to the route.
He divided his force into two parts.
The A Column was the slower of the two and departed on 15 May.
It was preceded by a scouting party of 26 Mounted Infantry under a native
officer. These
mounted troops moved ahead of the main column to seize key water-holes,
sometimes skirmishing for them but always being able to deploy more effective
firepower than the Fur Army could. These desert water-holes had small
openings about two feet square to prevent sand falling in and the water lay at
considerable depths. The water was drawn up in a skin bladder on the end
of a long thin rope and it took considerable skill and all the hours of darkness
to bring up sufficient water to sustain the men and animals in a column.
The key water-hole of Mellit was seized on 18th May after a RFC bombing raid
caused the Fur garrison to withdraw.
The faster moving B Column left
a day later and caught up 30 miles east of Abiad on 17 May.
An aircraft flew over the Field Force to carry out a reconnaissance of
Mellit. As it flew over the wells
the Fur tribesmen opened fire hitting the aircraft’s propeller.
The pilot retaliated bombing and strafing a large group killing two women
and wounding 8 other people. The
raid had the effect of clearing the way for the Field Force to capture Mellit
without any opposition on 18 May.
The Force, now considerably fatigued, concentrated at Mellit and rested in
preparation for an advance south onto El Fasher.
On
12 May 1916 Lt Bellamy of the RFC carried out an aerial reconnaissance of El
Fasher (al-Fashir) and dropped leaflets promising a return to freedom, security
and justice to the townsfolk. Two
days later the Field Force was at Abiad some 80 miles from El Fasher.
Here Col Kelly faced a dilemma.
The direct route was across waterless terrain while the longer, indirect
route, went by way of Mellit where there was a good water supply.
This diversion added 26 miles to the route.
He divided his force into two parts.
The A Column was the slower of the two and departed on 15 May.
It was preceded by a scouting party of 26 Mounted Infantry under a native
officer. These
mounted troops moved ahead of the main column to seize key water-holes,
sometimes skirmishing for them but always being able to deploy more effective
firepower than the Fur Army could. These desert water-holes had small
openings about two feet square to prevent sand falling in and the water lay at
considerable depths. The water was drawn up in a skin bladder on the end
of a long thin rope and it took considerable skill and all the hours of darkness
to bring up sufficient water to sustain the men and animals in a column.
The key water-hole of Mellit was seized on 18th May after a RFC bombing raid
caused the Fur garrison to withdraw.
The faster moving B Column left
a day later and caught up 30 miles east of Abiad on 17 May.
An aircraft flew over the Field Force to carry out a reconnaissance of
Mellit. As it flew over the wells
the Fur tribesmen opened fire hitting the aircraft’s propeller.
The pilot retaliated bombing and strafing a large group killing two women
and wounding 8 other people. The
raid had the effect of clearing the way for the Field Force to capture Mellit
without any opposition on 18 May.
The Force, now considerably fatigued, concentrated at Mellit and rested in
preparation for an advance south onto El Fasher.
The Field
Force stayed at Mellit until 21 May when it resumed its march.
mounted troops keeping in touch with large parties of Fur horsemen and
camel-mounted troops.
All day the column was shadowed
by Fur tribesmen who remained close enough to be visible.
At 0530 on 22 May the Field Force advanced again in open square formation
through large sand dunes that limited visibility.
This was one of the last occasions that a large British square advanced to the
attack and it must have been a memorable spectacle and experience for those
involved.
From the moment it set off large bodies of tribal cavalry and camelry maintained
a close watch. Kelly, therefore,
sent forward a company of the Camel Corps with 4 Maxims to reinforce the Mounted
Infantry who formed the front face of the square.
About 1030 a large force of tribesmen was spotted on the left of the
square and dispersed by Maxim and artillery fire.
 It was getting very hot and Kelly ordered a halt
half a mile further on where there was some tactically favourable ground.
Here they started to entrench their positions for the midday halt and
perhaps gain some relief from the fierce heat.
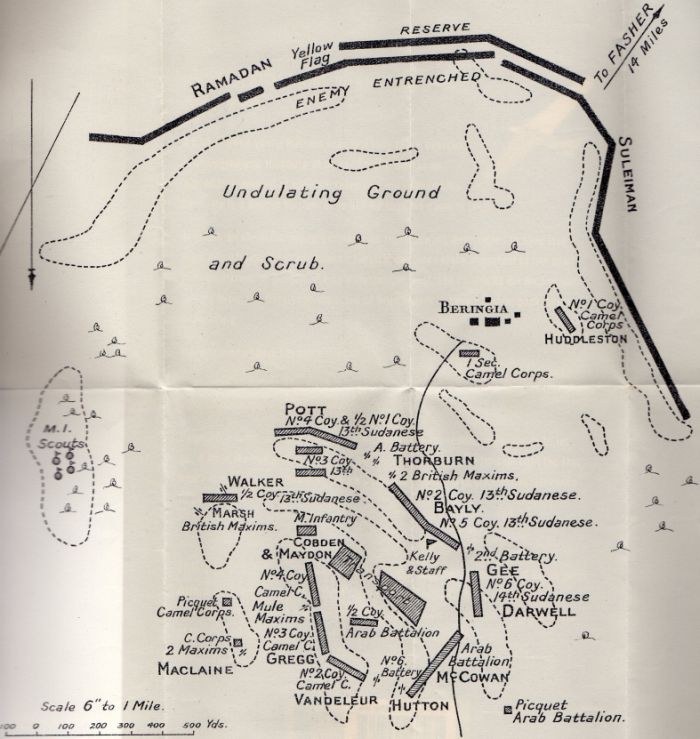
They were now only 12 miles from El Fasher.
About 500 yards in front of the British square lay the village of
Beringia (Birinjiya) and 600 yards beyond that was a
wadi in which the main body of the
Fur tribesmen lay hidden. The
wadi was entrenched and a number of
rifle pits and small forts had been constructed to shelter groups of riflemen.
This battle line was spotted by Kelly’s scouts though only a small
portion of the entrenchments containing about 200 tribesmen could be seen from
the square. Kelly was “uneasy about these lads”.
And he was right to be uneasy; the enemy to his front numbered some 4,000
warriors concealed in a mile of trenches and the
wadi.
They had dug their positions along the flank of the expected march line
and expected to be able to launch a devastating charge from close range from
their concealed positions.
It was getting very hot and Kelly ordered a halt
half a mile further on where there was some tactically favourable ground.
Here they started to entrench their positions for the midday halt and
perhaps gain some relief from the fierce heat.
They were now only 12 miles from El Fasher.
About 500 yards in front of the British square lay the village of
Beringia (Birinjiya) and 600 yards beyond that was a
wadi in which the main body of the
Fur tribesmen lay hidden. The
wadi was entrenched and a number of
rifle pits and small forts had been constructed to shelter groups of riflemen.
This battle line was spotted by Kelly’s scouts though only a small
portion of the entrenchments containing about 200 tribesmen could be seen from
the square. Kelly was “uneasy about these lads”.
And he was right to be uneasy; the enemy to his front numbered some 4,000
warriors concealed in a mile of trenches and the
wadi.
They had dug their positions along the flank of the expected march line
and expected to be able to launch a devastating charge from close range from
their concealed positions.
Having
established the enemy’s position, Kelly decided to launch a flank attack with 3
companies of Sudanese infantry and 4 British-crewed Maxims from the left front
of the square onto the right flank of the trenchline.
They were to be supported by the fire from two companies of infantry and
8 guns on the front face of the square.
While the troops were forming up the Camel Corps, under Maj Huddlestone,
(who had been commissioned from the ranks of the Coldstream Guards into the
Dorsetshire Regiment),
having escorted the square’s Maxims into position were now advancing without
orders to some high ground overlooking the village.
Why ‘Huddle’ as his contemporaries called him made this move is not known, but
perhaps from his elevated seat on his camel he had seen more of the enemy trench
and wished to observe the full length of it.
This impetuous action drew the
tribesmen into an uncontrolled advance.
Major Huddleston’s move triggered a general enemy attack as the Fur swarmed out
of the trench in their brightly-coloured robes, raised their battle-flags and
raced towards the hated British infidels. Huddlestone’s company now
withdrew, firing volleys by alternate sections, and this apparent retreat
spurred the Fur warriors onwards. The infantry on the two sides of the
square now swung forward to join the face in one long firing line containing
eight Artillery guns firing case ammunition (quantities of metal balls), four
Maxims and five companies of Infantry.
The Fur warriors displayed tremendous courage in storming forward to attack the
British firing line.
They showed the same
fanaticism, courage and disdain for wounds that they had done under the Khalifa
at Omdurman. Indeed they were
dressed in a similar fashion with patched
jibbehs and coloured battle flags.
Their bravery was no match for the intense fire put out by the massed
rifles, machine guns and artillery of the mobile square.
Alexander Pott was commanding the left front corner of the square, steadying his
men and issuing fire orders. Successive waves of attackers were cut down by
massed firepower, the nearest warriors getting within 10 yards of Pott’s
Sudanese before being killed.
As the confidence
increased, the sides of the square swung out to present a firing line of five
companies of infantry, 4 Maxims and 8 guns.
After
40 minutes of carnage the Fur finally wavered and fell back. Lt Col Kelly
then ordered a counter-attack and as the Sudanese Infantry, supported by
Artillery and Maxims, trotted forward offering the bayonet the Fur broke and
fled. Alexander Pott’s men captured a large yellow and green embroidered
flag, believed to have been made and blessed in Mecca. (This flag was
later presented to Governor-General Wingate.)
The 800 tribal cavalry
led by Bushir Musa kept a safe distance from the battle waiting their chance to
perform their traditional role of pursuing a defeated enemy.
Out
of an estimated 4,000 attackers the Fur left 261 dead and 96 seriously wounded
on the battlefield. Because of their ability to accept wounds that would
have immobilized Europeans probably many more seriously wounded Fur were
carried, walked or staggered away. The British casualties were three
Officers wounded, five Other Ranks killed and 18 wounded. Major
Huddlestone’s Camel Corps company, which Lt Col Kelly had mentally written-off,
had conducted a fighting withdrawal back into the square and had suffered only
four men slightly wounded. ‘Huddle’s provocation of the enemy had drawn
the Fur out of their planned fighting position and onto the British guns.
That afternoon at 1600 hours the British Force advanced towards El Fasher,
halting and entrenching a few miles outside the capital. Here at 0300
hours next morning 500 Fur cavalry with 300 infantry attacked the British
square. The British illuminated the battlefield with star shell and
magnesium flares, giving the Artillery and Maxims another good shoot.
After ten minutes of heavy defensive firing this attack was dispersed, again
with heavy casualties. A British aircraft piloted by Lieutenant John
Slessor (later to become Air Marshal Sir John Slessor) bombed the Fur assault
group in daylight as it withdrew towards El Fasher.
The way to
the Fur capital was open. Sultan
Ali Dinar made a last stand at his palace on El Fasher
where he
tried to rally his men for another attack on the British, but his two best
commanders had been killed at Beringea and his men started dispersing.
His force was made up of
his bodyguard, some of the survivors of the battle of Beringia, the palace
guards, blunderbuss-men (kashkhangia),
and attendants under the command of Tibn Saad el Nur together with 1,000
military cadets who had the nickname gora
or young locusts (hoppers). This
force, in fact, was greater than that sent out to fight at Biringia.
They were also of a much inferior quality.
A bombing raid by a single aircraft of the RFC soon broke the resistance
in the palace and the Sultan fled with his surviving followers.
The ubiquitous Lt
John Slessor bombed these dispersing troops at the southern end of El Fasher,
but Fur riflemen hit his plane.
It is alleged that Ali Dinar
shot at the plane with a sporting rifle suposedly given to him by the Governor
General and hit the pilot, Lt Slessor in the thigh.
The wounded Slessor was unable to operate the rudder pedals and flew back
to Abiad against a strong headwind.
He had to work the rudder pulling the control cables by hand.
At 1000 hours Lt Col Kelly and the mounted troops entered El Fasher, which now
was inhabited by women, children and old men.
Captain MacMichael explored the Sultan’s Palace and reported that it was:
“ . . . a perfect Sudanese Alhambra . . . There are small shady gardens and
little fish ponds, arcades, colonnades, storerooms and every type of building.
The floors are strewn with fine silver sand . . .Trellis work in ebony is found
in place of interior walls and the very flooring in the women’s quarters, under
the silvery sand, is impregnated with spices.”
Palace records had been scrupulously maintained and one book, using a page for
each lady who bore them, listed the names of about 120 of the Sultan’s sons.
MacMichael forgot what the number of daughters was.
After the fighting the Field Force gathered 237
assorted small arms at Beringia and another 1,150 more from the Sultan’s
armouries at El Fasher. As the Fur
warriors surrendered another 1,733 more guns were handed in.
Over 50,000 rounds of ammunition and 4 cannon with 100 case shot were
also captured.
 But
Ali Dinar was still alive and so the campaign continued. On 29 May
Colonel Kelly received a letter from Ali Dinar, renouncing his sultanate and
requesting that he may live with his family quietly on his lands. Kelly
replied that on his surrender the Sultan would be given safe-passage elsewhere.
(He would probably have been sent across the Red Sea to exile in the Hedjaz in
Saudi Arabia.) Ali agreed, saying that he would come in after the rains,
but he then wrote again to say that he could not convince all of his men to
surrender. Kelly wrote again, requesting that he surrender, but by now the
British knew that Ali Dinar was playing for time and so would have to be
captured or killed.
But
Ali Dinar was still alive and so the campaign continued. On 29 May
Colonel Kelly received a letter from Ali Dinar, renouncing his sultanate and
requesting that he may live with his family quietly on his lands. Kelly
replied that on his surrender the Sultan would be given safe-passage elsewhere.
(He would probably have been sent across the Red Sea to exile in the Hedjaz in
Saudi Arabia.) Ali agreed, saying that he would come in after the rains,
but he then wrote again to say that he could not convince all of his men to
surrender. Kelly wrote again, requesting that he surrender, but by now the
British knew that Ali Dinar was playing for time and so would have to be
captured or killed.
On 7th October Kelly sent Major Huddlestone with 250 dismounted men from the
Camel Corps and XIIIth Sudanese Infantry, Alexander Pott’s Battalion, south to
establish a fortified post at Kas, east of Jebel Marra (Marra Mountain).
Whilst on the march ‘Huddle’ heard that a Fur force under the former Sultan’s
eldest son Zakariya was at Dibbis
with 120 riflemen and 1,500 spearmen,
on his flank and threatening the British lines of communication. ‘Huddle’
rounded up some ponies for his men (now nicknamed ‘Huddlestone’s Horse’) rode on
Dibbis, made a surprise attack on 14 October on the Fur camp and routed Zakariya
and his troops.
Major Huddlestone, realizing that he was now near Ali Din’s own camp, requested
reinforcements so that he could attack. His request was denied by both
Kelly and Wingate because they were awaiting the end of the rainy season before
mounting another large military operation. However, as we have seen,
‘Huddle’ was not the kind of chap to let the grass grow under his feet whilst
senior officers pondered. He heard of a Fur camp not far away at Kulme
south of Zakingei
and so he marched with 100 men on ponies and mules.
He launched a dawn attack supported by machine guns.
The Maxims dispersed the tribesmen, and whilst most of Huddlestone’s men
made for the loot and the female companionship in the camp, Huddlestone and a
small party chased the best-dressed party of fleeing Furs over a series of
ridge-lines, shooting as they pursued. When
the sites were cleared the troopers found the body of Ali Dinar shot through the
forehead. Beside him lay his
wounded son, Mohammed Fadl and standing nearby were two more sons Husseyn and
Seif el Din together with the chamberlain, Hasan Sabil waiting to surrender.
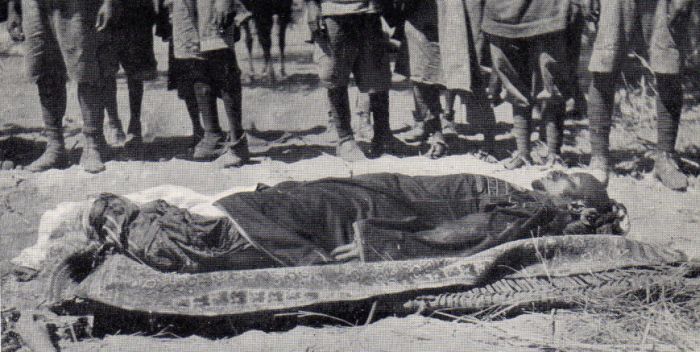 “
. . . after about the third rise we came on a thick-built form, with a strong
and dignified face marred only by cruel, sensuous lips, with a bullet hole
drilled through the centre of his forehead. It was Ali Dinar.”
“
. . . after about the third rise we came on a thick-built form, with a strong
and dignified face marred only by cruel, sensuous lips, with a bullet hole
drilled through the centre of his forehead. It was Ali Dinar.”
On 1st January 1917 Darfur became a province of the Anglo-Egyptian Sudan under
civil administration. Major Hubert Huddlestone MC, who had so ably
demonstrated the military virtue of immediately seizing and maintaining the
initiative, was awarded the Distinguished Service Order and Bar, he also
received six Mentions in Despatches during the war, and went on to become
Governor-General of the Sudan in 1940 – 47. Captain Alexander Pott gained
a Mention in Despatches and the silver Khedive’s Sudan Medal 1910 with clasp
“Darfur 1916”. He fought on in the Sudan and earned more clasps and
Mentions in Despatches.
Air Support
The air
support of a detachment from No 17 Squadron RFC was provided until 27 May when
Lt Slessor was wounded and all the other pilots had fallen sick or lost their
nerve. Not only that, the climate
had rendered the aircraft unserviceable.
Finally
the impending rainy season forced the Royal Flying Corps to withdraw to Egypt to
repair planes and pilots.
The
sources vary about which aircraft were used by the squadron.
They mention BE2 aircraft which were two-seaters, others talk of
unidentified single seaters. In
most accounts only pilots are named.
The RAF history says that the squadron deployed to Palestine with a mix
of BE2 reconnaissance bombers (right below) and DH2 scout (fighter) (below left)
aircraft and operated BE12 in Macedonia in 1916.
It may be that the single seaters were in fact the BE12s which were the
single seat variant of the BE2 produced by fitting a more powerful engine and
covering the front cockpit or they were DH2s or maybe just the old BE2s flying
with only a pilot on board to save weight in the hot climate.
I’m
afraid that you will need to use your own judgement.

The Fur People
 The
Fur people were Muslims of mixed Arab and Negroid stock and their military
organisation followed that of the Madhist forces.
Before Ali Dinar had been defeated at Rizayqat by Musa his regular forces
had numbered 1,700 cavalry and 6,000 riflemen.
By 1916 these regulars had been reduced to 800 cavalry and 3,000
infantry. These forces had rifles
but little in the way of ammunition or training.
The elite were the mulazimin
or bodyguard. The rest were formed
into three divisions (ruba) commanded
by Adam Rijal, Adam Ali and Mahmud al-Dadinjawi (in 1910).
Each division was a mixed force of cavalry and infantry.
The lowest tactical unit was the
miya, nominally 100 men but more often 50-70 in the bodyguard and 30-50 in
the other divisions. Included
within its numbers, the army had numbers of slaves drawn from the Azande and
Niam-Niam tribes, for example, as well as the Fur tribesmen.
The spearmen were distributed on a territorial basis to the divisions and
were recruited from the local villages.
The
Fur people were Muslims of mixed Arab and Negroid stock and their military
organisation followed that of the Madhist forces.
Before Ali Dinar had been defeated at Rizayqat by Musa his regular forces
had numbered 1,700 cavalry and 6,000 riflemen.
By 1916 these regulars had been reduced to 800 cavalry and 3,000
infantry. These forces had rifles
but little in the way of ammunition or training.
The elite were the mulazimin
or bodyguard. The rest were formed
into three divisions (ruba) commanded
by Adam Rijal, Adam Ali and Mahmud al-Dadinjawi (in 1910).
Each division was a mixed force of cavalry and infantry.
The lowest tactical unit was the
miya, nominally 100 men but more often 50-70 in the bodyguard and 30-50 in
the other divisions. Included
within its numbers, the army had numbers of slaves drawn from the Azande and
Niam-Niam tribes, for example, as well as the Fur tribesmen.
The spearmen were distributed on a territorial basis to the divisions and
were recruited from the local villages.
Dress and Equipment
The Fur tribesmen would not have looked out of place in a
Madhist force. The usual clothing
for war was the jibbeh with or
without the coloured patches worn by the Madhist Ansar and a photograph, taken
at the time, shows striped and chequered
jibbehs. Most wore a
white turban while many leaders wore metal helmets with a chain mail ventail and
chain mail coats. Some observers
noted that though most of the jibbehs
of the leaders were white many wore strawberry-coloured, bright yellow and green
and gold. Fur tribesmen of rank
wore a white waist sash and sometimes another sash worn over one or both
shoulders with the ends tucked under the waist sash.
The cavalry was largely made up of Baggara tribesmen who wore the
jibbeh, pantaloons and turban.
The Sultan’s bodyguard wore white jibbeh, trousers, turban and a leather
bandolier.
Firearms were common in Darfur though they tended to be old
types of breech loaders, muskets and shotguns.
The Sultan’s bodyguard were armed with Martini-Henry rifles.
Few warriors had more than 5 or 6 rounds of ammunition in battle.
The amount was severely constrained by the production capacity of the
Sultan’s small arsenal which could only produce about 3,000 rounds a year.
The artillery arm comprised a handful of small ex-Egyptian
guns.
Most warriors were armed with stabbing and
throwing spears, the safariq (a heavy
wooden axe), daggers and throwing knives.
The British
Sudanese infantry made up the bulk of the column and they
wore a brown woollen pullover, khaki covered white fez, sand coloured breeches,
khaki puttees and black boots. In
this campaign they carried the SMLE rifle.
The equipment was a brown leather belt, pouches and braces with a
bandolier for ammunition and a haversack and water bottle completed the normal
equipment.
The British troops wore the normal First World War tropical
khaki drill uniform and carried the Lee-Enfield Rifle.
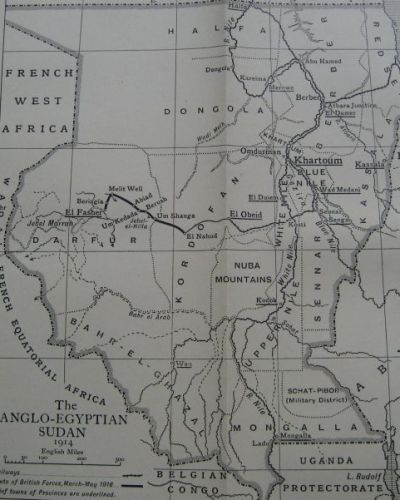
Terrain
Darfur is an Islamic Sultante surrounded by inhospitable
country. Between Darfur and the
Mediterranean Sea lay 1,000 miles of desert while
to east a broad belt of sand dunes separated it from Kordofan and to the
south the tsetse fly effectively stopped animal movement.
It was only to the west where terrain very much like Darfur extended that
any expansion was possible. Darfur
has few wells and no permanent water supply so farming and life depended on the
rainy season from July to September when 15 to 20 inches fell each year.
This water was stored in reservoirs of various kinds and the local
inhabitants the living trunks of tebeldi
trees each of which could hold up to 500 gallons (2,250 litres).
 It
was then, as it is now, a harsh hot, arid land where the few inhabitants eked
out a barely subsistence level of existence.
The land was characterised by grey rocks, red sand and sparse thorn
bushes. The north of the Sultanate
is made up of rolling steppes and mountain ranges from which small valleys
provide some reasonable grazing pastures.
The south is a clay plain covered in scrub and tough grass.
The grass grows quickly after the rains and soon scorched by the sun.
The western sand hills are cut by
wadis, dried up water courses, and in the east, sand stretches on seemingly
endlessly. The almost waterless and
ancient slave trail, the Derib el Arbaeen,
“Forty Day Road”, still takes camel caravans from Kobbe in Darfur to Assyut in
Egypt.
It
was then, as it is now, a harsh hot, arid land where the few inhabitants eked
out a barely subsistence level of existence.
The land was characterised by grey rocks, red sand and sparse thorn
bushes. The north of the Sultanate
is made up of rolling steppes and mountain ranges from which small valleys
provide some reasonable grazing pastures.
The south is a clay plain covered in scrub and tough grass.
The grass grows quickly after the rains and soon scorched by the sun.
The western sand hills are cut by
wadis, dried up water courses, and in the east, sand stretches on seemingly
endlessly. The almost waterless and
ancient slave trail, the Derib el Arbaeen,
“Forty Day Road”, still takes camel caravans from Kobbe in Darfur to Assyut in
Egypt.
The rout selected by the British for their advance was over
low sand hills broken by wadis, depressions and scattered bush limited
visibility to a few hundred yards at best.
This meant that while part of the mobile square might be on high ground
it could not see other parts in depressions or dead ground.
The Fur tactics were based on avoiding a fight on open ground or allowing
the British to use their long range artillery and machine guns by making use of
dead ground and entrenchments. The
force hidden in the entrenched wadi
at Beringia could have proved decisive had not Huddlestone triggered a premature
charge.
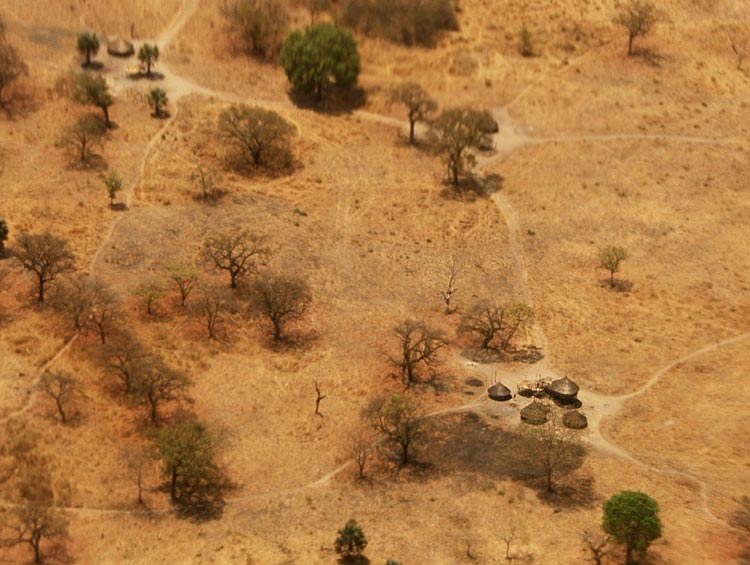
The main town of El Fasher was large and built on the sides
of a depression. The buildings were
mainly of circular houses with tall conical thatched roofs surrounded by grass
fences. The most notable buildings
in the town were the mosque and the tomb of the Zakaraiya, the Sultan’s father.
The suq (market) was a maze of
narrow alleyways. Water was drawn
from the many wells in the wadi.
High up on the western side of the depression was the Sultan’s palace set
in its own walled enclosure. The
palace was a two storey building surrounded by gardens and nearby stood the
women’s quarters. These buildings
and the many others crammed in between the gardens and ponds were whitewashed.
The interior walls were painted and decorated with texts from the Koran.
The villages outside the town were surrounded by stone walls
about six feet thick topped by a wooden palisade.
Inside stood the same circular huts with loose stone walls and tall
thatched roofs with a distinctive tuft at the apex.
Ali Dinar Zakariya Mohammed al-Fadl was a poor diplomat but a
competent commander. Using his
scouts and by gathering intelligence he was able to correctly predict the
British axis of advance. He
selected and prepared an excellent position and plan for a battle at the village
of Beringia. The British, had they
marched past as expected, would have been subjected to a surprise attack from
the flank and possibly rear. He was
defeated by several factors;
·
Lack of modern weapons
·
Impetuous junior commanders
·
A
largely untrained force
·
Shortage of ammunition
Abd el-Majid was the Sultan’s military adviser who had been a
Lieutenant in the Camel Corps and who had deserted when he argued with his
British Commanding Officer.
Ramadan Ali, a former slave, was the commander-in-chief of
the Sultan’s army and wazir, chief
minister to the Sultan. The other
chief commander was Sulayman Ali who was also a former slave.
Both were killed in action leading their men from he front in typical Fur
style. Mahmud al-Dadingawi assumed command after Ramadan Ali.
Col Kelly was competent officer who planned and executed a
decisive campaign. Although the
battle at Beringia did not go as he planned it he was able to exploit the
successes of his rather impetuous subordinates to give a decisive victory.
He was ably assisted by Major Huddlestone who went on to
become Governor General of the Sudan in 1940-47.
He was known as Mortain Abuhigl (the hyena with white feet) from his
reputation for night marches and his habit of wearing white spats to keep thorns
out.
Building Your Forces
Oddly enough modelling the forces for this obscure campaign
in 1/72 using mainly plastic model soldiers is relatively simple as almost
everything is available in various colonial and Sudan War sets with a few
gunners from some WW1 sets.
The Fur
The Fur tribesmen are most easily modelled by using a mix of
Waterloo 15 Dervish Infantry and the forthcoming HaT Industrie box.
The former depict Dervishes in the “Fuzzy Wuzzy” dress and the latter in
Riverine Arab dress. The ESCI
Muslim Warriors box also provides a few useful figures, particularly the
riflemen. The infantry can be
supported by HaT Taaishi and Hadendowah Camel riders.
The cavalry arm is converted from Airfix Bedouins and the mounted figure
from the Waterloo 15 Dervish box.
This latter fellow only needs to be remounted on a horse
while his mule/donkey can be used as a pack mule, casualty transport or
for civilian use in the villages.
Other suitable leader figures can found amongst ESCI/Italeri/ERTL Saracens and
HaT’s El Cid Ranges. If you want to
field the Sultan’s guard then both the HaT Dervish box and the ESCI Muslim
Warrior sets provide several suitable figures.
The bulk of my forces are spear and sword armed infantry are
based in multiples of 1, 2, 3 and 5 with the “5s” predominating to facilitate
casualty removal. This will, of
course, be dictated by the rules that you choose to use.
The tribesmen are organised into large bands of different strengths, each
under a leader with several warriors carrying the usual small banners to add
colour and interest. These bands
have a leader in brighter clothing and who is marked by a standard bearer
carrying a larger flag. The
riflemen are generally skirmishers or positioned to give fire support and so I
base them individually. However,
they have smaller units and no flags.
The cavalry and camelry are also organised into bands of no fixed size
commanded by their own leaders and, when grouped together, by a leader with a
standard bearer. The flags that I
use are generally small ones bearing inscriptions from the Koran in the tribal
bands while the large Battle Flags are usually of a single colour again with an
Arabic inscription. The inspiration
for these flags and banners comes from the various films, books and websites of
the Sudan War as well as the films “Lawrence of Arabia” and the “Wind and the
Lion”. Not entirely accurate I know
but they look the part!
The tribesmen wore pretty much the same clothing as the
Dervish Ansar tribesmen depicted in the boxes of soldiers.
Whether they still wore the patched
jibbeh I am not certain.
Mine do not. The ordinary
warriors wear white or off-white.
The British and Sudanese
The British and Sudanese infantry come from the Waterloo 1815
set of Anglo-Egyptian Army for the Sudan campaign.
In it you will find Egyptian, Sudanese and British infantry and a mounted
officer. Each box also contains 4
models of General Gordon. He has a
few uses as he is as mule drivers but his head can be used to convert other
boxes of artillerymen, for example, into Sudanese gunners.
Mounted infantry can be made by grafting the torso of the sitting
infantryman onto the body of the mounted officer.
The Camel Corps come from the HaT Egyptian Camel Corps set without any
modification though purists might like to give some companies a turban in place
of the fez.
 For air
support you can use one of the Veeday BE2 models if you can find one but these
were limited run and are expensive models even on e-bay.
Personally, I use the venerable Revell Airco DH2 model.
It looks the part and might even have been there.
Alternatively the Airfix RE8 (left) could be used to substitute for the
BE2 but this is an old kit which is not only difficult to assemble but is also
quite fragile in a wargame. I use the
Revell Airco DH2 because I like the model! Since the aircraft were
very decisive you will need to represent them and so the choice is yours.
For air
support you can use one of the Veeday BE2 models if you can find one but these
were limited run and are expensive models even on e-bay.
Personally, I use the venerable Revell Airco DH2 model.
It looks the part and might even have been there.
Alternatively the Airfix RE8 (left) could be used to substitute for the
BE2 but this is an old kit which is not only difficult to assemble but is also
quite fragile in a wargame. I use the
Revell Airco DH2 because I like the model! Since the aircraft were
very decisive you will need to represent them and so the choice is yours.
Motor transport for my little army came from Model T Ford die
cast made by EFSI and bought on e-bay.
These can be painted khaki and some can have larger cargo bodies and
canvas canopies added. Not strictly
accurate but I was able to get a reasonable number quite cheaply.
There are cars, vans, tankers, pick ups, fire engines, ambulances and
cranes in the series. Everything a
well-equipped motor column needs!
Only the artillery and machine guns are lacking from the
boxes and these can either be scratch built or found in some of the colonial
20mm ranges. I use Maxims from
Tumbling Dice and scratch built the mountain guns using Airfix Waterloo French
Artillery limber wheels that I had lying about.
The whole lot can made relatively cheaply and present quite a
spectacle!
Scenario 1
Scenario 2
Inch High Page
Back to top
Back to Home page